Charcoal Block Blanket

I was asked by my friend E to make a blanket for her husband A a long while ago. I was a little nervous to do it because of its size. He’s well over 6 foot tall so this blanket needed to be huge. It actually rivals the one I made for Luke (who is also over 6 foot). She had given me a picture of a blanket she saw somewhere on the internet and asked to make one using the same blocking/stripping pattern but in different colors. I looked all over for a pattern but couldn’t find one and had to make my own. Which wasn’t difficult. Just needed to make my gauge and do some math. No big deal.

It was terrible. It was super simple to make since it was just row upon row of sc. It was just so boring because it was row upon row of sc. I did a lot of binge watching on Netflix during this blanket. I used my (then) favorite ergonomic Boye 5.0mm hook. I mean I had to, this thing was going to take forever and I needed my hand to be comfy.

CharcoalBlock1

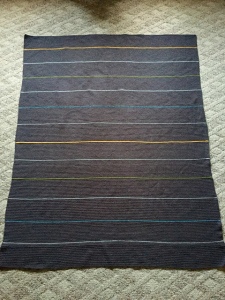
The main blanket was done using RHSS in Charcoal. The contrast colors were Lion Brand Heartland in Glacier Bay, Lion Brand Wool-Ease in Avocado, Red Heart Soft in Light Gray Heather, and RHSS Gold. There was 376 total rows consisting of 28 rows in each charcoal block, 13 total blocks and one row of contrast color between each with the color sequence repeating twice. Finished measurements were 62 x 80 inches or 5.2 x 6.7 feet! I told you, it was a behemoth.

CharcoalBlock2

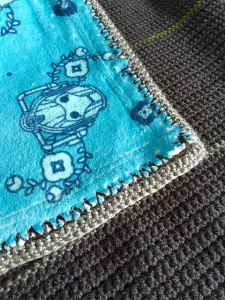
E wanted this thing as comfy cozy as possible and asked that it be lined with fleece. Awesome! I had been wanting to try this technique so I was eager but also very nervous that I’d mess it up. She had ordered this beautiful Doctor Who fleece. Now was the make or break time to attach.

I got a rotary cutter with an extra wide skip stitch blade and used it along all four edges to create equally spaced holes in which my hook would be inserted. Worked like a dream! I did have to press a little extra hard so I made sure I had proper backing so I wouldn’t cut through the surface I was working on.

CharcoalBlock3

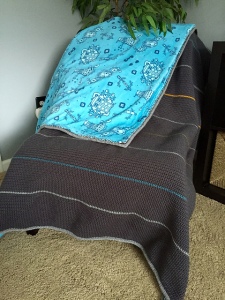
To attach I made sure the blanket and the fleece were pinned together and then I single crocheted the two together using the Charcoal. Not every stitch of the blanket was used since the holes in the fleece were not that close together. It’s fine though and everything is still together. I finished it off with 3 rounds in the Light Gray Heather.

CharcoalBlock4

It is amazing!!! I wish I didn’t have to give it away. It’s so big and cozy, heavy, and super warm! Just my kind of blanket. This was the most documented project I’ve done. I ended up using a total of 13.36 skeins of yarn for a grand total of 4,654 yards used!! ::faint:: Do you know how far that is? That’s 38.78 football fields (including end-zones). That’s more fields than the NFL has teams! It’s also 2.64 miles. MILES OF YARN! That’s just a little info about what it takes to make projects like these (and why they cost what they cost).

I’m not sure if I’ll ever make another blanket of this size. And if I do, it’ll be for me. Because I’ve never made a blanket for myself. Which is saying something because I have somewhat of a blanket addiction. I can think of 4 off the top of my head that are all partially started for myself that’ll probably never get finished. Sigh. One day….

On The Hook:

  • Baby Girl Dress
  • Baby Boy Things
  • Floor Poof

Soot Sprites!

If you don’t know yet I’m a huuuuuge Studio Ghibli lover. I’m slowly amassing my Blu-ray and paraphernalia collections. My absolute favorite movie (that I’ve seen) is Kiki’s Delivery Service! On my personal to-do list is Jiji the cat. But I’m not here to talk about me! I previously made my best friend E two Ghibli themed gifts in the past, No-Face and The Duck Spirit. Both of those are from Spirited Away, E’s favorite movie. I wanted to make her something quick for her birthday and what better than these little soot balls?!

sootsprite2

Soot Sprites are little creatures created from soot to work in the boiler room of the bath house in the movie. They’re adorable little fluffy balls. They have little arms and legs and love to eat little candies. I used RHSS and Lion Brand Fun Fur in black with a 5.0mm hook. I used Nichole’s Nerdy Knots’ Soot Sprite Pattern to make these. I used pieces of a black sock as the filling and hot glued eyes on the front.

sootsprite3

These came out so stinkin’ cute!! I need to make many of these for myself to keep in corners of rooms 🙂 And I couldn’t resist this little photo shoot with them!

sootsprite1

On The Hook:

  • Graph Designing (almost done!)
  • Chevron Blanket
  • Baby Boy things

Sorting Hat

Ok so getting back into the swing of things, this should be where I left off.

Luke’s cousin C told us that she was expecting a wee baby boy in October 2015. Yay! It was slightly pretty easy to figure out what I was going to make Baby L thanks to the interest of his parents C and J. C is really big into Harry Potter so what was better than a teeny tiny little sorting hat?? And J plays hockey so how about a little hockey set?? Adorable! Today’s post will be on the sorting hat (was it obvious?) and the next two will cover the hockey set.

sorting-hat1

I used A[mi]dorable’s free newborn sorting hat pattern with RHSS in coffee and a 6.00mm hook. I used such a big hook because she has no gauge listed and I wanted the hat to be wearable somewhat. I had also found an error on Round 17. It should read: sc x 3, inc x 7, sc x 3 (38). I also added two more rounds after rounds 26-29 because I didn’t think it was long enough. Remember, I wanted this to be bigger than newborn size. I left out round 33. I thought the brim was wide enough without it and doing that last round made the brim more straight than wavy. Overall I thought this was a great pattern! I had a lot of fun sewing on the eyes and mouth.

sorting-hat2

On the Hook:

  • Triangle Scarf for class
  • Baby Boy things
  • Mandala Shrug

Hogwarts House Scarves

I have made several Harry Potter scarves over the years. Five House scarves and one Quidditch Team scarf to be exact. I plan to have a complete House set for myself one day. I know there’s a bunch of patterns out there for the basic big block scarf look (which is what I’ve always done) but I still would like to share what I did. Before I get to that I would like to share a bit about these projects. It all started many many years ago…

Back in high school my best friend E introduced me to the world of Harry Potter by taking me to see Prisoner of Azkaban in theaters. Yes I know I started out of order but it happens. We even played hooky and skipped school to see it!! (Sorry Mom) I loved it so much I needed the others! So then I saw Chamber of Secrets and Sorcerer’s Stone (again out of order). I still needed more! That Christmas my brother (with a little help from my dad) gave me all the books which was just 1-5 at the time. Those books quickly rose to become one of my favorites.

Flash forward and it is now 2007 and Order of the Phoenix is being released in theaters. It was our first midnight movie release and I wanted to make it special. I made Gryffindor House Scarves for E and myself to wear. Don’t we look adorable?

hp1

While we were in line there was a couple sitting next to us who we started chatting to. I don’t remember their names anymore but they loved what I had made. They ordered scarves for themselves with the name “Harry Potter” and “Lily Evans” also embroidered on the ends. It was my first paid order. EVER! I was so excited. I really wish I had taken pictures but I didn’t. Oh well

Then came the midnight movie release of Deathly Hallows: Part 1. I was going to see it with Luke instead of E so naturally he needed a little bling. Since his favorite character is Krum I made him a Bulgarian Quidditch Team scarf. I did it in the same fashion but used the colors from the movie. He doesn’t wear it much so I kind of commandeered it for myself.

hp2.JPG

The books had ended, the movies were over, and I thought that was going to be it. But then it was announced we were all getting a new movie!! I can not WAIT to see this! It was at that point I caved and joined Pottermore. Turns out I’m a Hufflepuff. Should have seen that coming. I vowed that I was going to make a new scarf for the new movie in my house. AND HERE IT IS!!! I absolutely love it!

hp3.JPG

So without further ado, here’s my pattern!

Worsted Weight Yarn – I used Red Heart Super Saver in Bright Yellow and Black (Hufflepuff), Burgundy and Gold (Gryffindor), and Burgundy and Black (Bulgaria)

Size I – 5.5mm hook

Start with Main Color (Yellow or Burgundy)

Row 1: chain 22, sc in 2nd chain from hook and across. Turn [21sc]

Rows 2-18: chain 1, sc across [21sc]

Change to Contrasting Color (Black or Gold)

Rows 1-18: chain 1, sc across [21sc]

The yellow was thinner than the black for Hufflepuff. So I had to do 17 instead of 18 rows to get each block to be the same size. Mine are 4.125 (4 1/8) inches tall.

Repeat these two blocks for a total of 19 blocks, ending with Main Color.

To add fringe I wrapped yarn around my phone 5 times before cutting. Attach on ends in every other stitch starting with Main Color for a total of 11 tassles. Each fringe should have 10 strands of yarn. I left my ends at different lengths but I might go back and cut them all the same.

That’s about it! Very simple. Don’t forget to weave in your ends!!

HufflepuffHouseScarf