Diglett Pokemon #050

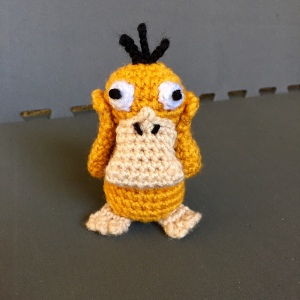
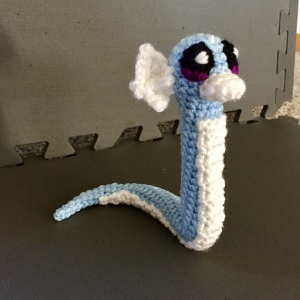
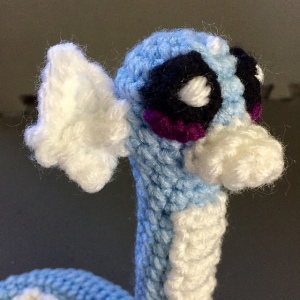
I didn’t play the card game as a child but my brother did. Between his cards and the little fake ones on the back of Lunchables (anyone else remember those? Nope, just me?) the only Pokemon I truly remember from my childhood was Diglett. So I couldn’t leave him out!! I used Nichole’s Nerdy Knot’s Diglett Pokemon Pattern. I also used RHSS in Coffee and Heather Gray with a 4mm hook. He stands at 4 inches tall.

Diglett

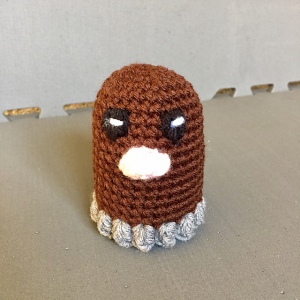
Only a couple very minor changes were made. I added a very slight change to Round 18 on The Body, the popcorn round. I put a chain between each one. I’m not sure if it was because my stitches were tight but it really helped. The math on Round 20 is wrong. You’ll end with 10 not 12 sc. I decreased around on Round 21 and ended with 5 sc. The math on The Nose is wrong too. Round 3 should end with 10 sc and not 8

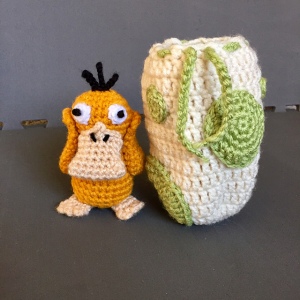
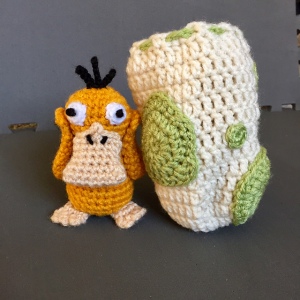
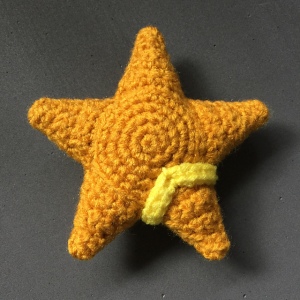
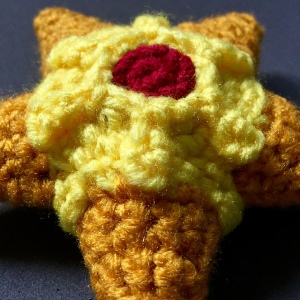
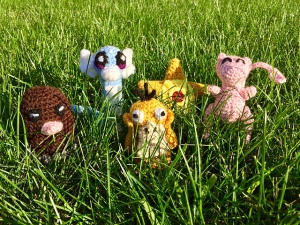
Look at how cute they all are!! I now need to make every. single. Pokemon so that I have an army of them!!! mwahahahah

PokemonGroup

On The Hook:

  • Tea Tray Doily
  • Knitted Beanie

Pokemon Egg Pouch

I wanted to surprise my sister with some of the Pokemon so I decided to hide a couple of them in some Egg Pouches. This way it would be like she hatched them! Keeping with the theme I used Nichole’s Nerdy Knots’ Pokemon Egg Pouch pattern. I used RHSS in Aran and Vanna’s Choice in Sweet Pea with a 5mm hook. It turned out to be 5.5 inches tall.

So my Pokemon didn’t fit inside the egg the way it’s written. So I modified it so they would fit. I’ll share those modifications with you all if you find your Pokemon also don’t fit.

EggPouch1

The Pouch: I did the dc rounds up to 12 rounds total for Mew and up to 13 rounds total for Dratini. I kind of had to squish Dratini in there but he made it.

I wanted my spots to look like the spots on the eggs in the game as much as possible. So I went off of those from what I could see and just made up the others/back sides as I saw fit. These directions for the spots are of my own design

EggPouch2

Main Spot on the egg in the game
Rnd1: mr 6sc
Rnd2: inc around
Rnd3: *sc, inc* around
Rnd 4: 2sc, inc, 2sc, inc, 4hdc, dc, (dc, tc), dc, hdc, sc inc, 2sc, inc

Bottom Spot:
Rnd1: mr 8sc
Rnd2: *sc, inc* around
Rnd3: *hdc, inc* around
Rnd4: 2sc, inc, 2hdc, inc, 2dc, inc, 2hdc, inc, 2sc, inc, 2sc, inc, 2hdc, inc, 2dc, inc

Back Spot:
Rnd1: mr 7sc
Rnd2: *hdc, inc* around
Rnd3: *hdc, inc* around
Rnd4: 2sc, (3hdc), 3hdc, 2sl st, sc inc, sc inc, sc, inc, 2sc, inc, dc inc, hdc, sl st, 2 sc, inc

Medium Spot:
Rnd1: mr 6sc
Rnd2: *sc, inc* around

Small Spots (2):
Rnd1: mr 6sc

I followed the pattern for the string and it made the perfect little drawstring pouch! I freaking love it!! This would be great for making and leaving as little gifts in parks as Random Acts of Kindness for other players!

On The Hook:

  • Mom’s Beanie
  • Tea Tray Doily
  • Knitted Beanie

Psyduck Pokemon #054

Next in the line up of Pokemon for my sister was Psyduck. I found him completely adorable so I couldn’t pass up making one for her. I again used Nichole’s Nerdy Knots’ Psyduck Pokemon pattern. I also used RHSS in Gold and Vanna’s Choice in Beige with a 4mm hook. I only made a few minor adjustments to this pattern.

Firstly, I did NOT stuff the arms. It wasn’t mentioned to stuff or not so I started by stuffing and then pinning in place. They were waaaaay too bulky. Made it look like Psyduck works out haha. So I took out the stuffing and it was perfect. The arms can either lay flat or be squished to puff out a bit. I also sewed them on along round 9 and way down at the bottom

psyduck

Two things with The Beak. First, it mentions removing a stitch marker but there was no mention of were to place the marker to begin with. I discovered that the marker should be placed at the first stitch of every round. It worked for me anyway. Second, I found the beak to be waaay too big. So what I did was take out 1 chain in the very beginning. So Round 1 started with ch8 and ended with 16 sc. Everything else is the same except that there is one less sc when there’s a few in a row. So Rounds 3, 4 and 6 have 5sc instead of 6. Round 7 has 4sc instead of 5.

On The Eyes I added in a black french knot BEFORE sewing onto the head. It worked out a lot easier.

The Feet really freaked me out. They looked super weird and I did not get why they were little tubes at all. I did Rounds 1-5 as written. But I finished them like The Arms. Instead of doing a row of sc to close it I just made the toes/fingers through both layers at the same time. I then sewed them on flat on the bottom/underside of him

I added a 5th round to The Tail so it would look more like the game. It went like this: 2sc, 2sc inc, 2 sc (8)

Because of all these changes I gave the pattern a 4 out of 5 stars and a medium difficulty rating.

On The Hook:

  • Mom’s Beanie
  • Tea Tray Doily
  • Knitted Beanie

Staryu Pokemon #120

Next up on the list was Staryu!! Can’t really remember why exactly I chose to make this one but I did. I used Nichole’s Nerdy Knots’ Staryu Pokemon Pattern. I used RHSS in Gold and Bright Yellow with a 4.0mm hook. Love how this guy turned out!!

Staryu1

I found the second part of the Center Detail instructions to be a little weirdly worded. It’s just rows of 1sc that are attached to the inner yellow circle (made in the first part of center detail) and then sewn on to the outer yellow from the body. That’s where I sewed mine anyways. My rows were only 3 long instead of 4.

Staryu2

I also didn’t fully understand the Band Around Back at first. It didn’t click that it was just one long row of sc for a while. I needed to ch14 and do 13sc for the band to go around one leg. I tacked/sewed on the one end, then the other, and then on the back side I tacked it down to create that V shape.

Staryu3

I assembled mine a little different too. I did not sc around the edge. I didn’t like the ridge that created and it didn’t feel safe enough to hold in the stuffing. So I just sewed it together. I also did all the center details BEFORE sewing the pieces together. This way it was way easier to do them.

On The Hook:

  • Knitted Cabled Beanie

Save

Dratini Pokemon #147

The second Pokemon I decided to make my sister was the ever adorable Dratini! Again I used Nichole’s Nerdy Knot’s Dratini Pokemon pattern. I used RHSS in Light Blue and White with a 4.0mm hook. I had several problems with this pattern that made me want to rip my hair out. I will share with you (as always) what I did differently.

Dratini1

On the Body:
For the 12sc rounds I did not go til it was 8 inches. I went til it was about 5-5.5 inches. I then decreased to 9 sc around for 1.5 inches. 8sc rounds for around an inch. 7sc for a couple rounds. Then decreased by 1 sc til I reached 4 sc around. Total length is around 10 inches. I tacked down the body at the first decrease from 12 to 9

On the Belly:
I did 3sc across instead of 2. At some point after the curve and it’s now on the bottom, I decreased to 2sc for a few rows. And then I decreased to 1sc for I believe 3 rows to make a point.

I did the body this way because I didn’t like the drastic decrease in the diameter of the body originally as written. There was a big visible change and I wanted more of a slight decrease. I also wasn’t able to see a curve when the 12sc rounds continued for 8 inches. I’m starting to think that curve is just supposed to be where you want it to be. I wanted Dratini to be the same size as Mew since he was already done.

Dratini6

There is also no directions for the eyes. Like seriously nothing for them at all. So a little peeved about that. I went super hard on the detail of them though. I really wanted these guys to look like the real deal. And I think I accomplished that with Dratini. I’m super proud of him

On The Hook:

  • Knitted Cabled Beanie