Nordic Snowflake Cowl

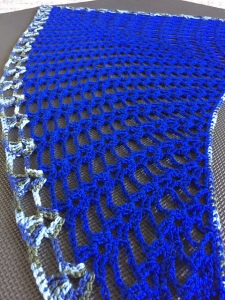
I’m not sure how many of you know but I teach crochet classes down at my LYS (local yarn shop) Lisa’s Sew Crafty. We started with a basic dc infinity scarf and have just finished up a bunch of snowflakes. I wasn’t entirely sure what I wanted to do next. It was then that R from Sit n Stitch mentioned she’s never done color work and would be interested. LIGHT-BULB!! What if we did a tapestry style cowl?? What if it was winter themed?? Off to Ravelry I went!

SnowflakeCowl1

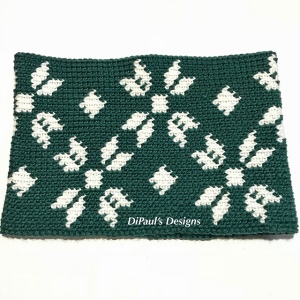
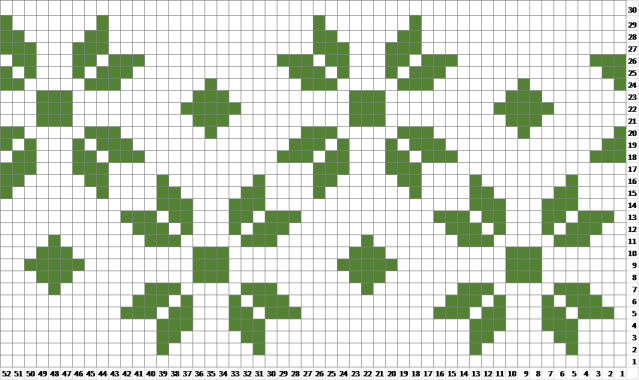
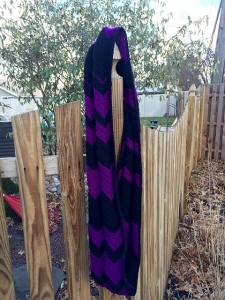
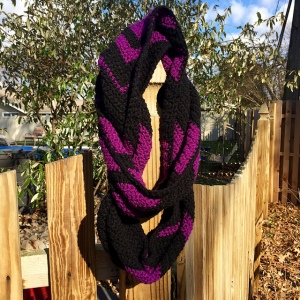
But I wasn’t happy with what I was finding. Off to Excel I went! After fiddling with those pesky squares for what seemed like hours (ok it was probably only one in reality) I had ended up with my Nordic Snowflake design! All that was left to do was grab some yarn and figure out a gauge. I used Ella Rae Cozy Soft Chunky in Forest Turtle and White Rocking Sheep with a 5.5mm hook. After a little math and some re-configuring my graph, I came up with a finished dimension of 25″ around by 7.5″ high. Perfect!

SnowflakeCowl2

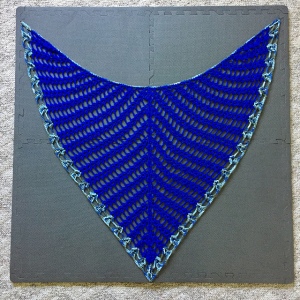
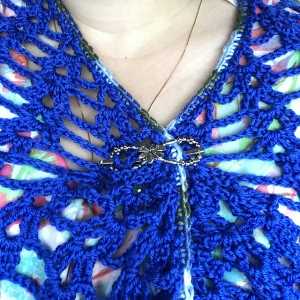
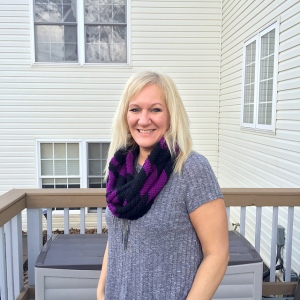
So without further ado, here is my very own Nordic Snowflake Cowl!! I hope you all have fun making this and feel free to share your finished projects here or on Ravelry!

Materials:

  • 5mm (US-I) crochet hook
  • Any aran weight yarn in two colors (I used Ella Rae Cozy Soft Chunky)
    • Color A (main color): 150 yards / 115 grams
    • Color B (accent color): 65 yards / 50 grams
  • Tapestry / yarn needle

Gauge:

  • 16.5 sc x 4 rounds in BLO = 4” x 1”

Terms Used:

  • St = stitch
  • Ch = chain
  • Sl st = slip stitch
  • Sc = single crochet
  • BLO = back loop only

Notes:

  • This pattern is worked one round at a time with a slip stitch join to the beginning of every round
  • The ch 1 at the beginning of each round does not count as a stitch
  • After round 1, every round is worked into the back loop only
  • Rather than changing, cutting, using bobbins, and weaving all the ends, the yarn is carried throughout the cowl. The active yarn is worked over the inactive yarn. This technique is called tapestry crochet
  • Graph is started at the bottom right corner. It is then read right to left and down to up. This is so that as you crochet your finished project will look like the graph
  • Each row of the graph is done twice in order to achieve proper circumference

Finished dimensions:

  • Circumference – 25 inches
  • Height – 7.5 inches

Instructions:

Color A: ch 104, sl st to form a ring. Be careful not to twist the ch!

Round1: Color A: ch1, sc in each ch around, sl st to first sc – 104sts

Round2-30: Working in BLO, read chart switching colors when needed – 104sts

NordicSnowflakeCowlGraph


Saffron Sweet Shawl

The wedding from a couple of posts back was in early September so I wanted to make something for me to wear in case there was the odd cold front. I did not get it done in time and the weather that day was really hot so thankfully I didn’t need the shawl.

SaffronSweetShawl1

I needed something to match the dress I planned to wear so I headed over to the LYS to see what she had. I grabbed some Ella Rae Cozy Soft in Royal and Big Splash. After some pattern digging I kind of fell in love with Cre8tion Crochet’s Saffron Sweet Shawl. I grabbed my 6mm and went to town!

SaffronSweetShawl2

I’m somewhat happy with the size but I still don’t really know how to wear it as it’s pictured in the listing. I wish someone would show me how. I also don’t think mine is long enough to do the tie thing. I did end up wearing it for Easter this past year with one of my Lilla Rose flexis to help hold it in place.

SaffronSweetShawl3

I’m still not sure I’ll ever give shawls a chance. Maybe some day…..

On The Hook:

  • Baby Boy things
  • Mr. Melty
  • Snowman Wallhanging

Bacon and Eggs Scarf

I was a fan of Full House growing up. I was excited and a little nervous (what if it was bad) to hear that Netflix was doing a Fuller House show! I gave it a shot and boy was I not nervous anymore! I laughed along with all my friends.

One of the things I like about both shows is Kimmy Gibbler. She’s very unique and goes through life to the beat of her own drum (like I believe I also do). Because of this she has a very unique fashion sense. And one of the items she wore on an episode of Fuller House was a bacon and eggs scarf!

BaconEggsScarf1

I was freaking out because a crocheted item was on a newly popular show!! It became the talk of all the pages I follow. And it must have struck a nerve in the normal world because a friend of mine, L contacted me asking if I could make her her own!! Heck yes I would!

There was a pattern designer that I just had to go check out immediately to see if she had a pattern for this. Her name is Twinkie Chan and she designs THE BEST food patterns! Seriously, just take a look at some of these

I believe Kimmy has also wore a similar pizza scarf and maybe a cupcake one as well? I’ve only watched the first season so I’m not positive. Either way. I need all the food scarves!!

Twinkie Chan to the rescue!!! She has a pattern that is exactly like the one Kimmy wore. Maybe those in charge of costumes bought one from her? So I bought her Crochet Goodies for Fashion Foodies: 20 Yummy Treats to Wear book for Kindle and got to work!

BaconEggsScarf2

I used Lion Brand Vanna’s Choice in Scarlet and Beige, RHSS in White and Bright Yellow, and a 5.00mm hook to complete the scarf. The pattern was extremely easy to read and follow! I had absolutely no problems. It was the perfect length for L! If I were to make one for myself I think I would add at least one more bacon and egg. I like really long scarves.

BaconEggsScarf1

I doubled the egg whites so that it would have a plain back and it would make them a little more sturdy. I used scrap yellow yarn to stuff the yolks. I also sewed them all on in different spots to make it more real.

On The Hook:

  • Snowflakes
  • Knitted Hat

Toddler Tool Belt

The fourth and final item in this order was for a tool belt in coordinating colors with the hard hat. These might have been the cutest toys I’ve ever made! And super easy too since there was no stuffing required!! I used My Sweet Potato 3’s Tool Belt – Hammer, Wrench, Screwdriver Pattern in size 3-6 months. I used RHSS in Gold, Blue, and Gray Heather with 5.5mm and 6.5mm hooks.

ToolBelt2

When I made this the stitch counts on the belt were off. The button whole was super off and the length wasn’t what it needed to be. Christine was fairly quick with her response. Facebook was acting up so the delay wasn’t her fault. It wasn’t long at all for her to fix everything.

ToolBelt1

I was a little confused with the wording on the head of the wrench. So I kind of just did what I thought looked good to me. I think it all worked out in the end.

HardHat4

I think my favorite part about this is that the tools and holder are one size and you can continue making bigger belts as the child grows! It would also be adorable in pink or purple for a little girl’s set. Girls need tools too!

On The Hook:

  • Baby Boy Things
  • Snowflakes
  • Graph Designing

Chevron Infinity Scarf

It’s late November 2015. I’m in a major cro-jo funk since my nanny had passed at the beginning of the month and I had just finished a week long visit to see my pop-pop in Arizona. It’s coming dangerously close to Christmas and I had nothing for my mom. I was starting to think I was going to have to buy something (when was the last time I bought someone a gift…?) because I just didn’t have it in me to pick up a hook.

I’m not sure exactly what got me started again but this was the first thing I sat down and started and finished since my funk. I wanted something to match the hat I made her earlier in the year. I stumbled on Dandelion Daze’s Chevron Infinity Scarf pattern and fell in love! I used RHSS in Black and Dark Orchid with a 6.0mm hook. I used her pattern exactly for the width and chevron look but not stripe order.

momsScarf1

The coolest thing about her pattern was that she used a random stripe generator and it is amazing!! All I had to do was click my colors, how wide I wanted each stripe to be, and how many total rows I wanted. I just went with it a checked off 1-20 rows wide and I believe 200 rows total. Then I clicked the “Generate My Stripes” button and kept clicking refresh until I found a layout I liked. Easy peasy lemon squeezy.

momsScarf3

The one thing I did make sure of was that my first and last rows were the same color. I didn’t worry about that on the generator but just worked it in. I also bordered each side in black.

momsScarf2

Now she has a truly one of a kind scarf! I need to make one for myself in a couple different colors I think. Definitely some pinks. Maybe a dark blue. Or a gray! The possibilities are endless!!

On The Hook:

  • Baby Girl Dress
  • Angel
  • Baby Boy things